
Tags
Recently, I posted some pictures on Instagram of a two-color modification I made to The Prismatic Scarf pattern by Huan-Hua Chye on Ravelry. Several people were interested in how I worked it, so below is my attempt at step-by-step instructions. These will likely make the most sense if you are familiar with the original pattern (linked above).
This modification is worked so that the front and back look identical except that the colors are reversed. It requires working with two strands of yarn simultaneously, and I recommend high contrast colors in order to make the pattern pop. My sample was worked in two colors of Malabrigo Rios on #9 (U.S.) needles.
INSTRUCTIONS:
Cast on 36 stitches using one of the yarns (it doesn’t matter which). You can make the scarf wider or narrower by increasing the number of stitches cast on in multiples of 6.
Row 1: [establishing row]
In the cast-on color, K3, P3 (repeat to end. You should end on a K3.
Row 2: [1st pattern row]
1) Pick up contrast color and K3 using both colors. On each row moving forward, you will knit 3 stitches at the beginning and the end of the row using both strands. This carries the yarn forward and provides a border to help the scarf lay flat.

2) At the end of K3, separate the strands so one comes forward [color A] and one goes behind [color B] (pictured above). Going forward across the row, you will keep these two strands from crossing until they meet up again for the final K3 of the row.
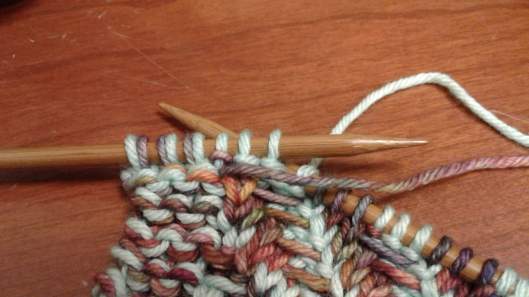
3) P3 using the color you put behind the needles [color B]. Carry the color you put in front [color A] (pictured above). For this row, you will be following the establishing row in stockinette stitch fashion (purling in the back of the knit stitches, knitting in the back of the purl stitches). Row 3 will begin the staggered stitching so that the knit/carry pattern will travel across the scarf at a diagonal.

4) K3 stitches using the color you carried across the front [color A]. Keep the purling color [color B] behind, taking care that the yarn strands do not cross.
5) Repeat the P3 with color B (carrying color A) / K3 with color A (carrying color B) pattern to the final three stitches. K3 to the end of the row using both colors.
Row 3: [2nd pattern row]
1) K3 using both colors.
2) Separate the colors so that color B is in front and color A is in back (the reverse of row 2).
3) On this row you will begin the stagger effect. With color B in front, P2 with color A.
4) Carry color B in front of the P2 stitches and K3 with color B. Continue to the last four stitches in the row.
5) K1 with color B then pick up color A and K3 with both colors to finish the row.
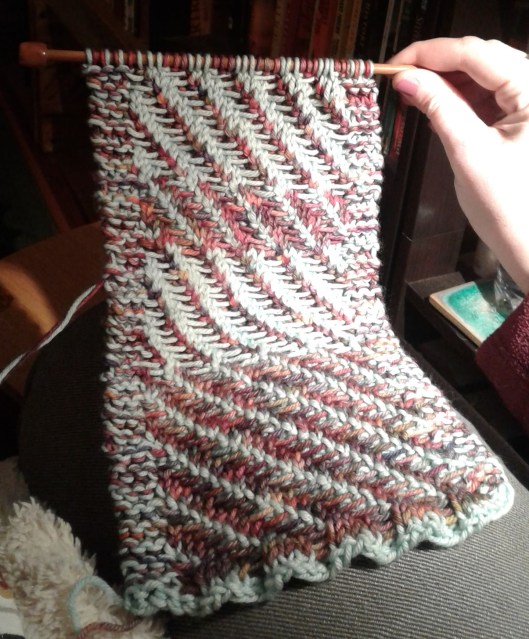
Continue alternating pattern row 1 and pattern row 2 shifting the K3/P3 pattern over by one stitch with each row. As you can see in the picture below, this means you will give your scarf the textured diagonal effect. When you are embarking on pattern row 1 the diagonal will climb from left to right, when embarking on pattern row 2 the diagonal will climb from right to left. 
You can play with the pattern further by changing up which color you treat as “color A” and “color B.” In the picture below you can see how I swapped the color A/B several times in this piece to get a striped effect. In the below example I also started with three rows of stacked (rather than staggered) rib to give the end of the piece a bit of a border.
PATTERN DIAGRAM
Below is a super simplified diagram of five rows to demonstrate how the staggered effect works. This graph assumes only 9 pattern stitches (with 3 border stitches on each side).
KD = Knit with both strands
kA = Knit with color A (carry color B behind)
pB = Purl with color B (carry color A in front)
kB = Knit with color B (carry color A behind)
pA = Purl with color A (carry color B in front)
Pattern Row 1 [work L to R]: KD-KD-KD-pB-pB-pB-kA-kA-kA-pB-pB-pB-KD-KD-KD
Pattern Row 2 [work R to L]: KD-KD-KD-pA-kB-kB-kB-pA-pA-pA-kB-kB-KD-KD-KD
Pattern Row 3 [work L to R]: KD-KD-KD–kA-kA–pB-pB-pB-kA-kA-kA-pB-KD-KD-KD
Pattern Row 4 [work R to L]: KD-KD-KD-pA-pA-pA–kB-kB-kB-pA-pA-pA-KD-KD-KD
Pattern Row 5 [work R to L]: KD-KD-KD–pB-kA-kA-kA–pB-pB-pB-kA-kA-KD-KD-KD
